Gem & Pollux
August 8, 2025
How I Built My Own Draw Bench for Jewelry Making
I’ve always loved finding ways to make my jewelry-making process more efficient, and recently I decided it was time to build my own draw bench. If you’re not familiar, a draw bench is a tool that helps shape and reduce metal wire, which is essential for creating custom pieces. Building one sounded intimidating at first, but with a few simple materials and a little creativity, it turned out to be completely doable! (All materials are linked at the bottom of this post.)
Materials I Used
Boat winch (bolts included)
Hotop Metal O Ring (4-inch, stainless steel)
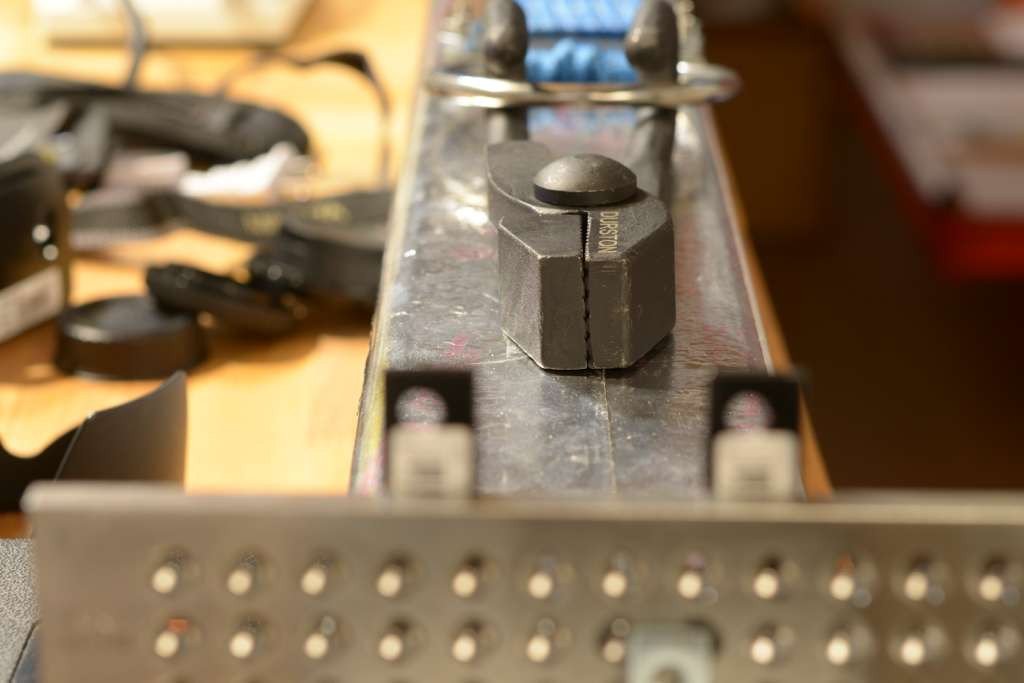
Durston draw tongs
Tungsten carbide draw plate
L-brackets for the front (two pieces, 2 inches tall)
L-bracket for the back (one piece, 1 inch tall)
Steel square stock
Screws & bolts
Hotop Metal O Ring (4-inch, stainless steel)
Durston draw tongs
Tungsten carbide draw plate
L-brackets for the front (two pieces, 2 inches tall)
L-bracket for the back (one piece, 1 inch tall)
Steel square stock
Screws & bolts
Step-by-Step: How I Assembled It
- Setting up the frame
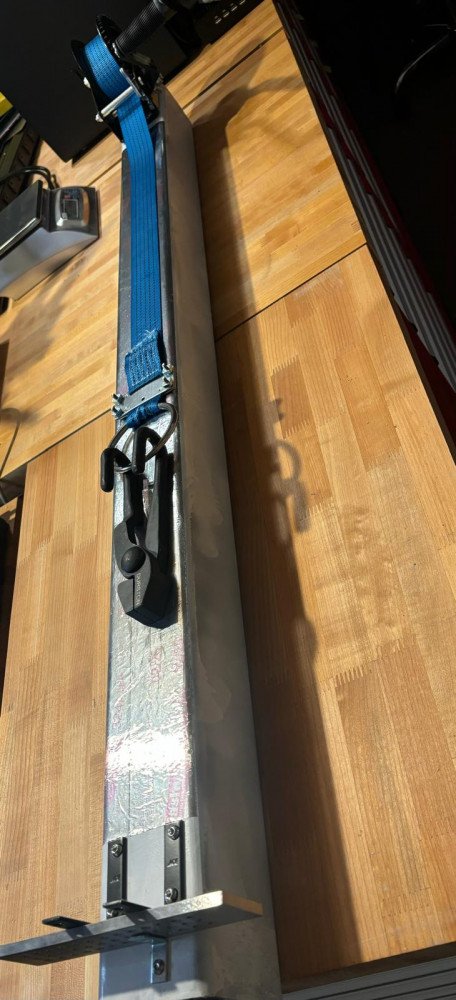
I started by using a sturdy base. Stability is key because the draw bench needs to handle a lot of pulling force without tipping or shifting. I used a 4 ft section of 4-inch x 4-inch steel square stock. - Mounting the winch
Next, I attached the boat winch to the frame. It was important to make sure it was secure and aligned properly for smooth operation. I bolted the winch down to the steel frame, tested the crank to ensure smooth movement, and then bolted the entire setup to my table for extra support. - Securing the draw plate with L-brackets
This step was a game-changer. I added the two 2-inch front L-brackets to hold the draw plate in place while pulling, and the single 1-inch back L-bracket to prevent it from falling. Something so simple made the whole setup feel much more reliable. - Connecting the draw tongs to the O-rings
With the draw plate secured, I attached the draw tongs to the stainless steel O-rings. This connection allows you to pull and close the wire efficiently, and it’s surprisingly satisfying to see it work smoothly. - Testing it out
Before using it on any real jewelry, I tried it with some scrap wire. Everything pulled perfectly, and the draw plate stayed exactly where it was supposed to.
Tips from My Experience
1. Make sure your O-rings can handle the load.
2. Check the alignment of your draw plate; center it when pulling wire through.
3. Don’t forget to oil your wire before drawing.
4. Never underestimate the power of creativity when building DIY tools for your studio.
Building my own draw bench was easier than I expected, and it feels amazing to work with a tool I made myself. If you’re a jewelry maker looking for a DIY project, I highly recommend trying this!! It’s practical, fairly easy to assemble, and opens new doors for crafting jewelry with different wire gauges and shapes.
Tool Links
- Boat winch (bolts included): https://www.amazon.com/AC-DK-1600lbs-Heavy-Trailer-Ratchet/dp/B0CJY57NQ1
- Draw tongs: https://www.riogrande.com/product/durston-8-12-draw-tongs/113727GP
- Draw plate: https://www.riogrande.com/product/tungsten-carbide-insert-round-drawplate2/113561GP
- Two front L-brackets (2 inches tall): https://www.acehardware.com/departments/hardware/angles-braces-and-brackets/braces/5290135
- Single back L-bracket (1 inch tall): https://www.acehardware.com/departments/hardware/angles-braces-and-brackets/braces/5289608